Jump to content


Photo

NWN2 Walkthrough


  • Please log in to reply
2 replies to this topic

#1 Bluenose

Bluenose

    The gnome-sage of Ral Worcester

  • Member
  • 1565 posts

Posted 27 February 2008 - 07:28 AM

General Notes

The character I?m using in this walkthrough is Hermel Amren, a male human cleric of the Red Knight. While he starts out as LN, his alignment will fluctuate slightly through the course of the game, but I will usually pick the more lawful and good options when possible. He?s a front-line warrior cleric rather than a support caster, and it?s my intention that he?ll take levels in Warpriest and possibly Divine Champion. For those interested, the character is attached to this post.

I'm not usually going to mention alignment shifts in the walkthrough, for the simple reason that there are a lot of them. It's likely I will if something seems counter-intuitive, or if the shift is noticeable. I am including notes on how actions will influence your companions, and when I post the NPCs section I'll also include a more comprehensive list of ways to influence them through player-initiated conversations as well as in play. Items you pick up are somewhat random but if there's something something plot critical I will mention it.

Edited by Bluenose, 27 February 2008 - 07:34 AM.

Back from the brink.

Like RPGs? Like Star Wars? Think combining the two would be fun? Read Darths and Droids, and discover the line "Jar Jar, you're a genius".

These, in the day when heaven was falling,
The hour when earth's foundations fled,
Followed their mercenary calling
And took their wages and are dead.


#2 Bluenose

Bluenose

    The gnome-sage of Ral Worcester

  • Member
  • 1565 posts

Posted 27 February 2008 - 07:30 AM

Prologue

The first part of NWN2 acts as a tutorial for new players. It?s perfectly possible to skip it if you?re familiar with how things work, but you can play through it to gain a few useful items.

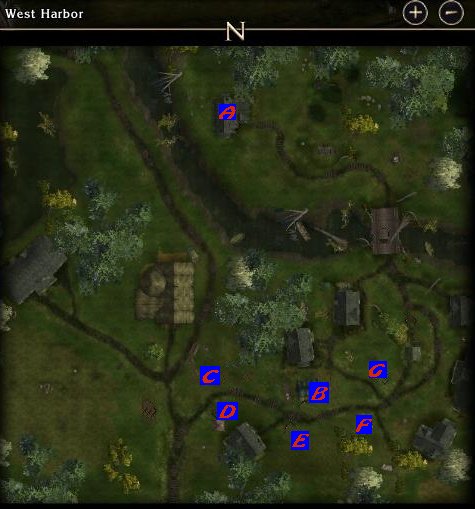
You start in Daeghun?s House (A on the map) listening to a short monologue from your elven foster-father. He?ll direct you to get some furs from the chest, and then he?ll tell you to take them to the merchant who is visiting the fair, sell them, and buy a Duskwood Bow for him.

Leave the house and follow the track towards the bridge. There you will meet two of your childhood friends ? Bevil and Amie. You can say what you want in the conversation that follows, but they?ll like you more if you aren?t too unpleasant. Since Hermel is trying to be a nice guy, he was nice to them.

Carry on across the bridge with your new minions, and listen to a conversation between the local mayor, Georg, and a farmer about trouble in the swamp. He?ll then talk to you about the Harvest Fair, and various questions will give you information about people who you?ll meet later in the story.

Following the track round, find the merchant you are supposed to sell the furs to (B). Sell the furs and buy the Duskwood Bow, then take it to Daeghun ©. He?ll comment that it?s a fine bow, with a little more animation than you normally get from him (400xp for quest completion). You can then enter the archery segment of the competition. Take a shot at the practice targets, then speak to Daeghun again to enter the competition proper. You?ll only miss on a roll of 1, and Hermel got all of them first time, but even if you miss one it?s still enough to win the competition (and give you 400xp).

The Knave?s Challenge (D) is run by Amie?s master, Tarmas. After some conversation, he gives you a poem to solve to find three feathers. If your character isn?t a rogue, you?ll need to recruit the child Kipp, who stands near to Tarmas, to provide you the relevant skills. The first is in a trapped woodpile just past the merchants stall. The second is in a locked chest between two houses a little further along the path. The last is in the pocket of a man dressed in green near to the mayor, and you need to use Sleight-of-Hand to recover it. Once you have all three return to Tarmas who will express his relief that this is over and declare you winner of the Knave?s Challenge (for 400xp)

When you?re ready for Amie to enter the Tourney of Talent (E), speak to Bevil?s mother Retta Starling. Amie has the right spells memorised, so you simply have to have her cast a Summon Monster I, then cast Enlarge Person on Bevil (or yourself), and finally destroy the nearby barrel with one of her 0-level spells such as Acid Splash. Talk to Retta again to win the Tourney (for 400xp and some spell scrolls).

After the Tourney, you?ll be approached by Orlen. He wants you to take a look at the pig that Lewy Jones entered into the fattest pig competition (F). Amie is able to identify that it?s been magically enhanced. One of the scrolls you obtain after the Tourney of Talent is Lesser Dispel, and you can use it to reduce the pig to its real size. If you approach the owner he?ll deny magic was used, but he will offer you a bribe if you let him keep it in. If Bevil is unhappy after your bet with the Mossfelds then he won?t let you do this. You can either accept a potion of Bless or you can use the Dispel scroll to end this travesty of justice and fairness and receive a reward of Pork Jerky (which acts as a healing potion) from Orlen (for 150xp either way).

The last event you can enter is the Harvest Brawl (G). If you decide to enter speak to Brother Merring, the village?s cleric of Lathander. You can win an interesting conversation about the villagers with him. Equip your characters with clubs (unless you?re a monk) and take the first fight, which is easy enough to win especially if this is the last event you enter and you?ve reached level 2. It?s a good idea to rest before facing the Mossfelds, and although it?s against the rules you can have a side-bet of 10gp with them. Bevil objects if you do bet (-5 to influence; +5 if you refuse outright). Hermel is far too lawful to do so though he?s quite happy to insult them by claiming he doesn?t believe they?ll pay up. Brother Merring will confirm you?ve won the Harvest Brawl (for 500xp).

Once you win, you can speak to Georg again. He?ll start the congratulatory ceremony on the stage at the far end of the village. You can talk to several of the people in the village as you head there to accept your prizes. You get the Harvest Cloak, the Harvest Cup, and 1000xp. You should be at 3rd level after this.

NPCs and Influence:

Bevil Starling, LG human male Fighter 1 ? a fairly ordinary human fighter who probably bears the brunt of the fighting if your character isn?t capable of doing so in the Harvest Brawl. He?ll be around for a while, so it may be worth taking care as you level him up. If you talk to him, he has various things to say about his family. +5/-5 Influence depending on whether you accept the Mossfelds? offer of a bet on the Harvest Brawl.

Amie Fern, human female Wizard 1 ? she has quite exceptional stats. She is essential for the Tourney of Talent and for the problem with the pigs. Talk to her to find out her ambition to become a successful adventurer.

Kip, human male rogue ? decent stats, used only if you don?t have the skills for the Knave?s Challenge.

Attached Images

  • West_Harbour_1b.jpg

Edited by Bluenose, 27 February 2008 - 07:31 AM.

Back from the brink.

Like RPGs? Like Star Wars? Think combining the two would be fun? Read Darths and Droids, and discover the line "Jar Jar, you're a genius".

These, in the day when heaven was falling,
The hour when earth's foundations fled,
Followed their mercenary calling
And took their wages and are dead.


#3 Bluenose

Bluenose

    The gnome-sage of Ral Worcester

  • Member
  • 1565 posts

Posted 27 February 2008 - 07:30 AM

Act 1

West Harbor

Bevil and Amie rush into your room claiming West Harbor is under attack. Equip yourself from the chest by your bed, then head out. Optionally you can enter your father?s room to loot an Amulet of Arvoreen (Aid 1/day) and the book Exotic Weaponry from a chest by his bed.

Downstairs, you?ll face an easy fight with three duergar raiders. After killing them, head outside and talk to Borther Merring. He?ll tell you to speak to Georg at the bridge, and cast a blessing on you. Fight your way to the bridge and help defeat the attackers. Georg will then ask you to find at least five members of the militia to start fighting back.

The closest is the badly wound Ward Mossfeld (1) just by the bridge. You can heal him yourself if you have any healing abilities, or you can go to Brother Merring to get healing herbs for this. Alternatively, cut his throat for a shift to Evil and to dispose of a rival. Crossing the bridge you?ll be attacked by a few more duergar. Lazlo Buckman (2) is fighting others nearby, and if you help him he?ll count to your total. Lurking by the side of one of the houses is Ian Harmon (3). He doesn?t want to fight, but diplomacy or threatening to beat him up gets him to join in.

Further along Tarmas is fighting a Githyanki mage (A). Amie tries to help, but only manages to get killed, after which the Githyanki teleports away. There?s a short conversation with Tarmas, where he basically gives permission to loot his house. You can obtain Alchemists Fire x 2, a scroll of Identify, Fochlucan Bandore, and some gold.

You can find Wyl Mossfeld near Tarmas? fight (4). Tell him you?ve helped his brother and heal him with the herbs, or kill him if you prefer. The nearby house holds Pierson (5), another member of the militia. If you smash the door in you can persuade or bully him into fighting, and once he?s out of the way lawless scoundrels can loot his chest. Outside the next house along is Pitney Lannon, who?ll join the militia if you ask. Webb Mossfeld (7) and an unnamed female militia-woman (8) are fighting some of the raiders. If you help them they will also join the militia.

Once you?ve found at least five members of the militia and sent them on, you can join Georg (B). He?ll lead everyone up the slope, till a wave of duergar and bladelings come into view. After you defeat them, a second wave appears. A third wave also appears, but this time some duergar break away and enter the Starling home. Bevil wants you to help out, and Georg agrees. If you don?t help the Starlings then you remain with the militia to fight off the next wave of attackers. At the Starling home ©, the duergar have been driven into one room. You have the option to set the families dogs on them, which makes this an easy fight, worth 75xp and a small alignment shift to good.

Outside, yet another wave of duergar and bladelings attack. A cut scene plays as Daeghun and some other rangers appear and start to shoot them down. After the fight, there?s another cut scene as the villages losses are enumerated, then there?s a conversation with Daeghun. He tells you that he thinks he knows what the raiders wanted and tells you to go to a ruin in the swamp to get it, sending Bevil with you. Although there is a variety of conversation options few of them lead to you gaining much useful information. You can either go immediately, in which case you are teleported to the starting point in the swamp, or stay to talk to a few people which gives you a chance to unload any loot you?ve picked up with Tarmas. If you do the second you?ll need to leave the village at the blue transit point and go to the ?Ruins? area on the world map.

Attached Images

  • West_Harbour_2.jpg

Edited by Bluenose, 27 February 2008 - 07:32 AM.

Back from the brink.

Like RPGs? Like Star Wars? Think combining the two would be fun? Read Darths and Droids, and discover the line "Jar Jar, you're a genius".

These, in the day when heaven was falling,
The hour when earth's foundations fled,
Followed their mercenary calling
And took their wages and are dead.