http://www.shsforums...it-grabber-v01/
...unless, of course, you're not on Windows, in which case you might be able to adapt some of the below.
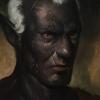
If you're like me, you've often seen fantasy art and thought to yourself, "That would make a really neat BG2 portrait." However, the time it takes to get the image, scale it properly into two different files, etc., prevents you from doing much of that unless you plan to use the portrait yourself.
Thanks to yours truly, that is no longer a problem! Now the world can be flooded withe every possible BG2 portrait under the sun!
This system is a little technical to set up, but as long as you're computer savvy, it shouldn't be a problem.
It is based around two open-source programs. GIMP 2 and ShareXMod.
1. Download and install GIMP 2 from here. You don't need the latest version. As long as you have a relatively new version of GIMP 2, it should work with this system.
2. Download and install ShareXMod from here. It's actually a pretty poor program, but it's the best one I could find for this purpose.
3. Find your GIMP script folder, which on Windows will be something like "C:\Users\yourusername\.gimp-versionnumber\scripts". In that folder, create a new file called "portrait-reform.scm" and paste the following text into it:
Spoiler
4. Now determine where you'd like all your new portrait files to go. I recommend creating a new directory somewhere. From now on we'll refer to it as the portrait directory.
5. In that portrait directory create a file called reformL.bat and paste the following into it:
Spoiler
6. Similarly, in the portrait directory create a new file called reformS.bat and paste the following into it:
Spoiler
7. Now in both above files, the path to the default location for GIMP 2.8 under Windows 7 is used. So, if your GIMP is installed somewhere else or you installed a different version of GIMP 2, change "C:\Program Files (x86)\GIMP-2.0\bin\gimp-2.8.exe" (WITH quotation marks) to the path to your GIMP 2 executable. You need to do this for BOTH above files.
8. Now start up ShareXMod. We need to configure it. In ShareXMod click on Settings -> Configuration...
a) Under Capture, make sure Show Cursor in Screenshots is unchecked.
b) Under File Naming, I heavily recommend something like "%unix" (without quotation marks). %unix will name the file with the number of seconds since 1970, so that it won't overwrite your previous portraits automatically. However, you can use whatever name you want as long as you go and change their name immediately.
c) Under Quality set Image Format to "BMP".
d) Also under Quality set "after (0 disables)" to 0.
e) Under Resize uncheck everything.
f) Under Paths set Screenshots to the full path to the portrait directory you chose before.
g) Also under Paths delete everything in the Sub folder pattern field. The field should have nothing in it, not even a space.
h) Optionally, under Advanced set Show After Capture Wizard to False. This will speed up the capture process a little bit, but if you leave it as True, you'll get to see a preview of what you captured.
9. Now close settings and click Settings -> Workflow.
10. Then click Add... This will open a new workflow window.
a) At the top of the window, name the workflow whatever you want. I use "Capture Large Portrait".
b) Change "Capture fullscreen" to "Capture rectangle region".
c) Uncheck Apply Default Settings.
d) Under Tasks, make sure everything is UNCHECKED except "Save to file" and "Run external program", which should be CHECKED.
e) Under External Programs, click Add... which brings up the Add External Program dialog.
f) Set Name to anything. I use GIMP.
g) Set Path to <the full path to the portrait directory you chose>\reformL.bat
h) Leave arguments as %filepath%.
i) Click OK and make sure your external program (ie. "GIMP" or whatever we called it) and only your external program is checked in the list.
j) Now click OK.
11. Now repeat step 10 but with the following changes:
a) Name the workflow something different. I use "Capture Small Portrait".
g) Set Path to <the full path to the portrait directory you chose>\reformS.bat (That is, an S instead of an L.)
12. Assign two different hotkeys to the two workflows you just created. I use F9 and F10, but anything sould work.
13. Now this step is VERY IMPORTANT. Close the Workflow window. Then find the ShareXMod tray icon, right click on it click Exit. This is very important because ShareXMod only saves its settings when it exits and it has a tendency to crash. If you don't do this you'll lose all your work since step 8.
Now you're done configuring ShareXMod, but here's how you use it. Go ahead and run ShareXMod again.
When ShareXMod is running, find an image you want to turn into a portrait. Hit the the Capture Large Portrait hotkey you assigned. Then drag and select the region you want to be the large version of the portrait. You don't have to worry about getting the right ratio, since any excess image on the BOTTOM will be clipped off automatically. Therefore, if in doubt, include too much on the bottom of the region you select. You can move and adjust the region you've selected. When it's good, hit Enter. If it shows you the Wizard, you can hit cancel if you don't like the capture or you can hit OK. Don't change any settings. Do the same thing with the Capture Small Portrait hotkey.
After you've captured all the portraits you'd like. Go to the portrait directory and rename them to something sensible. Each image should already have the appropriate L or S postpended.
Finally, make a bunch of really awesome portrait packs.
Thank you.
Edited by Alweth, 13 October 2012 - 04:39 AM.


![[MOD] Isandir's Portrait Pack - last post by K4thos](http://www.shsforums.net/uploads/profile/photo-thumb-6375.gif?_r=1404289774)